Showing posts with label DIY. Show all posts

Sunday, May 16, 2010

DIY Pocketfolds

This post has been a long time coming. I originally bought all the materials to create my own DIY pocketfolds way back in like November. I had done a few here and there but as of last week, I only had 34 out of the 80 that I needed complete.

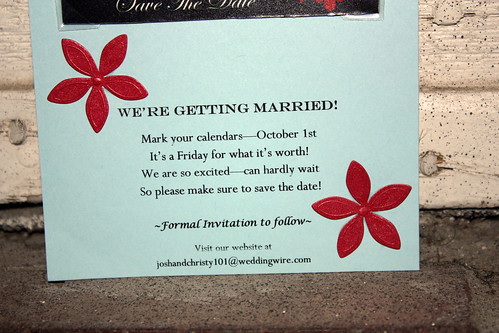
I have been awarded a huge blessing recently in my life. Apart from finally working again (which is a blessing in and of itself), I am working at a store that definitely has slow moments. That and working part time hours allowed me to crank out the rest of those invites in record time. So now I can present to you: my pride and joy, the thorn in my side, my beautiful pocketfolds.


For anyone looking to take on this task, I will forewarn you: it is a lot of work and it is tedious. But once you find your rythm, it goes pretty quickly and it is so awesome to watch them come together before your eyes. 

To start, this is what I used to create these babies:
  • Cardstock, pre-cut to 16 1/8" x 7"
            I ordered my cardstock pre-cut, so that all I had to do was fold, score and cut the flaps.
  • Paper cutter with a scoring blade (I bought mine at Joann Fabrics for $9.99 with a 40% off coupon)
  • Bone Folder (to help make nice, neat creases) 
  • Scissors to cut the flap/pockets
  • Pencil
  • Double sided tape

            I read lots of reviews on The Knot and decided to go with Super Tacky Tape in 1/8", which I ordered from Paper Source.    

    The Supplies:

Since I decided to be smart and make my life easier by having the cardstock precut (for no extra charge at the wonderful Anchor Paper) the process got started very quickly.
  • The first thing I did was made score lines where my folds would be (I always went left to right with each step so I never got confused which side was which). You will need three score lines per invitation:
  1. The first score should be at 3 inches from one end of the cardstock. This score is for the flap of your invite. 
  2. The next score is at 5 1/8 inches from the first score line. The section in between these first two score lines is where the main part of your invitation will be. 
  3. The final score is 5 inches from the second score line. This creates the fold that will eventually become your pocket.


    **Something I found that saved me SO much time, was rather than measuring and scoring one invitation at a time, the better thing to do was mark where the score lines needed to be on one invitation with a little hash mark on the edge with my pencil. Then, I just layered another sheet of cardstock on top of that and marked the same lines. I would do about 20 at a time like this and then score them. Its a little step, but it saved me a lot of time. **
After scoring them, I used a piece of scrap paper to make my templates for the pocket and the flap. I ended up going with a pointed flap and a pocket with a deep "V" shape.
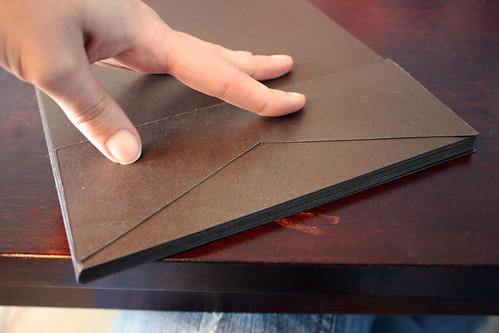
  • I used my flap/pocket templates to trace the shape onto my invite:
  
(Here I am placing my pocket template to trace it. )
MAKE SURE YOU TRACE IT SO THAT WHEN IT IS FOLDED UP THE POCKET GOES THE RIGHT WAY!
Tracing away. 
  • Once the flap and pocket templates were traced onto the invites, I used my scissors to carefully cut along those lines. 
These are my invites, scored, cut and ready to be taped. 

  • Next, I applied my double sided tape to both sides of where my pocket would be. I learned the hard way that you do need to do it to both sides or the cardstock would not stay tightly bound. 
 
FYI: I found this to be the most tedious step: applying the tape. It was hard to estimate how big each piece needed to be so I used my same pocket template and marked where the tape should end so I didn't have to guess. This eventually saved me lots of time and trying to peel off extra tape without ruining the cardstock. (Impossible and frustrating)

  • Peel of the plastic backing of the tape
  

  • Fold over the left side of the pocket and line it up.Press along the left edge to seal that side. Then, take your bone folder and crease along the bottom of the pocket to make a good fold. When you get to the right side, press down to seal that side too. Use your bone folder and press down along the edges where the tape is to make sure there is a good, tight seal.
                        **I have seen people fold and crease the pocket before applying the tape. I found this to be extremely annoying to do, because then the pocket wanted to flip up while you tried to put the tape on. Also, doing it this way (one side at a time) ensured that my pockets were straight.
  • Use your bone folder to make the second crease where the next score line is:

  • Make the final crease for the pointed flap.
 
 TADA! 
  • Fold the whole thing over itself and there you have it. A complete (DIY) pocketfold!


    Lessons Learned:
    I found that at first, this whole process took me about 10 minutes per invitation. That is because I was doing it in the dumbest way possible. AKA: each invite from start to finish, one at a time. Once I figured out that I could make it sort of an assembly line, it went so much faster and was so much more fulfilling. By creating my own shortcuts (marking where my score lines should be, taping before folding, etc.) I estimated that each invite took me about 2 minutes. I was able to finish 50 of them in an hour and a half. So, that is my recommendation for anyone who would like to take on this task. Take a stack of like 20 at a time to break up the monotony of certain steps (ahem, TAPE, ahem). Then, the condensed version of all this chatter becomes: mark your score lines, score, trace flaps and pockets, cut flaps and pockets, tape, adhere, fold, crease, tada! It really does become a routine and you will get faster. At the end of this very large undertaking, I can say I am so proud of myself for creating our invites from scratch. And so HAPPY because they are gorgeous! I cannot wait to get all the inserts designed so they can be fully assembled.


Sunday, May 9, 2010

Chaos!

Oh the ever growing pile of DIY projects just keeps growing! And somehow, every time I accomplish something another task seems to magically appear before my eyes. Currently, this is what my DIY room looks like:


Um. Yes. Complete and utter chaos. So many projects!

While on a (much needed) hiatus from pocketfolds, mom and I are on an everlasting mission to find the perfect stamp for the invitations. We found one we love on papersource.com which is an awesome site that has so many dreamy, crafty things on it. The stamp is called a cottage blossom but it basically looks just like the big flower on that red piece of scrapbook paper in the photo above. (The very piece of paper that has served as my wedding inspiration thus far)...The stamp itself is only $7.00, but then there is $10.00 shipping! Explain that one to me people...really....

I decided $17.00 for a stamp was a little assinine, especially considering I still had to buy ink, embossing powder and an embossing tool. So we made our way to Archivers. Archivers is a scrapbooker's paradise: full of stickers and paper and every kind of embellishment you can imagine. Before long, mom and I found a stamp that was pretty cute and talked ourselves into it. All the supplies cost about $37.00 and we got home and started playing and decided we still love the original stamp better. Go figure! So...being a retailer's nightmare, I really think I am gonna wash those stamps really well and try to return them. If I can't, I am selling those suckers on Craigslist. I am on a budget dang it...and I will stay on it!

In other wedding news, we have a HUGE check to mark off the list and I am so very excited to announce that one of our favorite people will be officiating the wedding for us! This amazing lady was actually introduced to us by my mom...because she works with her! Ms. Brandi was actually one of the main players in putting into motion the relationship my mom has now. Brandi pushed my mom to go for it and now my mom is engaged to him! Brandi and myself are kindred spirits...born under the same sign and you can tell. Since Josh and I do not belong to a church and have put it off this long, we decided that trying to find a church to call home now and getting to know the pastor there would be strained and awkward. And because it's only about 4 months away, it would really be like a stranger marrying us. Brandi has been around, hearing about Josh and I...our ups and downs...our big exciting news (my mom texted her right when we announced we got engaged and she even came to see the ring!) and everything in between and she knows us both. We love her and we are so excited to have her up there with us to seal the deal on our special day!

Friday, May 7, 2010

Guestbook

A long time ago, when all this wedding stuff was just a far off "to do"- Josh and I decided we did not like the traditional wedding guest book. You know the one: satin cover, lots of lined pages inside, matching pen in a little stand. BLAH. There are lots of reasons, besides the obvious tacky ones why we weren't interested. For one, people often forget to sign the guestbook in the first place. If they do sign it it is a scrawled signature complete with some obscure message like, "so happy for you two!" Lastly, what would we really do with a satin covered book full of people's signatures? Put it in a box, that's what.

Those ready made guestbooks also cost about $40 a piece. Not including the pen, which probably costs another $10 alone. I had thought for awhile about buying a really awesome coffee table book from Barnes and Noble and having people sign that. I think I would have chosen a book with beautiful black and white photography (a passion of mine), or maybe a book about the place where we chose to go on our honeymoon. That way, it would at least be something pretty we could leave out rather than stuff in a box. That idea got blown out the window when I could not find anything like that.

Without even thinking about it, I signed up for snapfish.com. I take a lot of photos and they are eating up the memory on the laptop. My intention was to store all my photos here so if the computer ever crashed, nothing would be lost. I spent a day uploading all seven billion photos that I have and pretty much forgot about it. The next day, I received an email from snapfish that they were running specials all through April. Just as a customer appreciation thing. The first special they sent me was for an 8x12 full color photo book. For ten dollars!

I booked it over to the site and fiddled with the book for probably two hours. I wanted it to be just right. I decided to put the lyrics to one of our wedding songs throughout the pages and used our engagement photos and pics of us taken when we were just tiny and dating. It came out so beautifully. Everyone who has seen it raves about it. It is one of my very favorite wedding details. My mom likes to listen to the song while she flips the pages...its very sweet. And for the price, it is a dream come true. I really do not think I could have liked any other guestbook better!


We are putting it on a table with a wooden cut out of the word, "WISH"...and making a cute little sign that will say something like, "please share the best love advice you have ever received or your wishes for Josh and Christy's future."


The guests will sign in silver sharpies. Across the black and white pages, it will look classy and I cannot wait to display our beautiful guestbook after the wedding!

Tuesday, May 4, 2010

Catch Up Day

Wow. I really am doing horribly at keeping up with blogging lately. Guess it's time to play catch up!

Just a few days ago, we reached yet another huge milestone. We are now exactly five months away from the big day. All I can say about that, is that - just like expected - time is moving incredibly fast. That is both good and bad. Good- because I cannot wait to spend the rest of my life with Josh as my husband! Bad- because there is still SO much to do and I honestly wonder sometimes how it is all going to get done!

My new job is going well. I am loving the fact that for the first time in 4 years, it's not really a job that requires strenuous thinking on a daily basis. All I mean by that is, basically I just have to show up and go through the motions. And often, the store is pretty slow, so that leaves me a lot of time to scheme and dream up things for the wedding. All this downtime convinced me too, that I should go back to school. That is a pretty big step for me since I swore off college about two years ago after starting but not finishing my 2nd consecutive semester. I really did not have a choice. It was so upsetting to me to watch all my friends just go to school and work when they could. I had to work...that came first. So I decided I was not going to let it get the better of me, and I would just act like I was too cool for school. :) Well, after a couple years it is fairly obvious that you cannot get anything besides a retail job without a college degree. I originally went to school to become a teacher. After teaching at a preschool (much different than high school yes, but still ) I realized maybe that was not the proper place for me. I love people. I love planning. I love making things easier for others. When I do finally go back, I'll be going to get my degree in Hospitality and Tourism. I figure there is so much I could do with that degree...my main goal is to use it to be a catering manager in a hotel. That way, I can help other brides plan their perfect day, and wedding planning will always be a part of my life!

Anyway, future dreams aside...we had to figure out how to make this wedding happen. Even with me working, the money situation was not looking good. Josh and I had a big heart to heart and laid everything out on the table. What we have. What we need. What we can go without. We made a huge Excel spreadsheet of everything and its cost and after doing that, it looks like we can make it happen with lots of help. Thankfully we have so many amazing people in our lives willing to support us through this whole endeavor. It is really special to have people on our side who realize how much Josh and I love eachother and want not only this wedding...but this marriage.

On the list right now: invitations. Those suckers are killing me. Currently, I am staring at the pile of unmade pocketfolds on the table with extreme amounts of loathing. At some point today, I will just have to suck it up, throw on some Pandora and get cracking. *sigh*

On a *lighter* note: my workout regimin really seems to be working. I have been at it for a little over a month and I have lost 10 pounds. I am already almost at my goal weight for the wedding. When I started working out, these were my various body measurements:

Bust: 34.5"
Upper Arm: 11.5"
Waist: 28"
Hips: 38.5" <--------this is the killer. I HATE my huge hips.
Upper Thigh: 24" <-------also incredibly gross to me
Thigh: 19.5"

A month later, after working out 5 days a week: 45 minutes to an hour of strength training and dance pilates and then 12 minutes per day of cardio:

Bust: 31" <-----figures these would be the first to go lol
Upper Arm: 10"
Waist: 25.5"
Hips: 36"
Upper Thigh: 21"
Thigh: 18"

Altogether that creates a total loss of 14.5 inches from around my body. I am not a very big person to begin with. I am absolutely shocked at the results I have seen so far. No gimmicks. No fad diets. Just good old fashioned working out and sweating. It has been so hard. Every day I have a few minutes where I just want to give up. And then I pull out the old size 5s out of the closet and they slip on easily and it is all worth it. I have not been in a size 5 since I was a senior in high school. Ultimately I would like to get down to a size 3. I know I still need to be healthy though so I am just going to keep doing what I am doing and let my body do what it feels like. I already look and feel so much better. It is so nice not to look in the mirror and be disgusted. The best part? No more squishy spots around the top of my pants. I think I was 15 the last time I could say that!
I will post photos of the before and after workout pretty soon. If I can manage to not be completely embarrassed by the before ones.

Our Charlie looks like a full grown dog now. Granted he is still little, but compared to the little punkin we brought home, he just seems huge now. He is so completely hilarious. Everyone keeps telling me I should write a book about life with Charlie. I keep joking I could call it "Charlie and Me" instead of "Marley and Me"...he really is just as much trouble as that dog. The other day, I was about to be late for work...frantically looking for my car keys. I remembered I left them on the end table (a very bad idea with Charlie). After tearing the living room apart, something told me the little monster had taken them outside. I had no clue where to even begin looking...but I was walking by a planter on the back patio when Charlie did a rather gymnastic pounce into it. Dirt went flying everywhere and the unmmistakable sound of metal clinking together rang out. He had buried my keys in the planter! It was all such a fun game for him to show me where they were too. I honestly could not even be mad. I was laughing too hard. He is almost 5 months old now and our (well Josh's) current heartache is that we have to "de-man" him soon. Ha ha. When we talk about neutering Charlie, you would think we were talking about doing it to Josh. He just looks so appalled at the idea. :) Men.

Charlie the day we brought him home (8 weeks old)
***note how he is smaller than one of those photo boxes which is like a shoe box***


Charlie today. (5 months)
 

His ears turned super pointy on us! My dad says he looks like a bat. I would have to agree. He also sits funny all the time like in this photo...all far back on his hips. Goofy. But we love him.

Saturday, April 24, 2010

Details, Details

I think my favorite part of weddings are all the tiny details. Things many people will not even notice...but I know they're there. And there are always those guests (my favorite ones of course *wink*) who catch every single one. Love.

I have been saving photos like no other of all my wedding details and so now I can share them here! Hopefully this will also make it easier for me to see what I have picked out and how those things are going to look together!

My dress, as I've previously posted, is quite big. It is not a ball gown because it is not all tulle and pouf. What it is, is a chiffon, silk and lace dream. Honestly, everyone who sees it says it looks like a cupcake or a dollop of whipped cream. It is a color called "antique gold" but it looks truly champagne in person. Like buttery soft yellow with a sheen. Seriously, you could probably lick it. :) To match this work of art, I have an elbow length ivory veil with beading around the edge. This will be worn for the reception obviously. Then, for the ceremony, I am going to remove the veil and add a fluttery flower behind my ear. My hair is going to be swept back into a low, romantic updo like this:


In order to compete with my dream of a dress, I wanted my beautiful girls to be in something similar. Its not like they could wear cotton, breezy dresses when I am in a super formal gown. I also knew I needed something flattering to all of them. My tallest bridesmaid is 5'9 and the smallest is 5'4ish (maybe, hehe). Obviously no girl is built the same, and I definitely did not want any of them to feel uncomfortable. One day, mom and I went and I tried on bridesmaid dresses just for fun. I picked a favorite and took my girls to go see it. They looked around the entire store and decided the one I had chosen was the one they wanted! So they will be in these adorable taffeta Mori Lee dresses, in Espresso, which is represented in the photo.
 
In person, this fabric has a slight sheen to it that matches my invitations perfectly. (Matchy matchy details!)

The minute the girls chose this dress, my mind was racing with shoe ideas. After all, I am a girl who owns over a hundred pairs of shoes and more often than not, my outfit is planned around my shoes. Shoes are the most important. I wanted the girls to have a fun, flirty pair of shoes they would not necessarily have a "reason" to buy until now but that they would be super excited to own. I think with this dress, the shoes I want are a 1940's-esque platform pump with some sort of cute embellishment in that amazing pomegranate color. These are my favorite I have found, BY FAR. I might buy a pair too, just because!

   
Ugh. Even looking at them now has me squealing at the screen. LOVE. 

One of the most important wedding details, in my eyes, is the cake. Of course it needs to be beautiful. But I am a traditionalist. It also needs to taste goooood. I have had some nasty wedding cake. And that's because there was more focus on the outside than the inside. I am simplistic in my view of a cake. I love the clean, white buttercream look. This is the cake I am wanting, but the centers of the flowers would be brown, rather than black. 


I also think this is a cake that we could make, if time and budget deems that necessary.

Going along with the color theme, I wanted a fun idea for escort cards. What we plan on doing is making a fun sign with guest's names and table numbers on them, and then at their seat they will find one of these sweet treats:

 
The labels will look MUCH different (aka match our theme) but this is the general idea. I think this is so cute and who doesn't love chocolate? Also, at Sam's Club these pretty candies are $10 for a box of 50. Not bad!

I know there are MANY more details but I will post about those as they come about! Can't wait to start getting some of this stuff done!

BIG check! Centerpieces!

Today was just one of those days where things just fell into place for the wedding. I love those days. I wish there were lots more of them than there usually are.

I have been going round and round about centerpieces. As usual, I have way too many ideas and far too little money or expertise to pull them all off. As with most things for this wedding, I wanted my centerpieces to be DIY. I also wanted them to be cost effective and not look cheap and cheesy. I know that is pretty dang near impossible to pull off but I was determined.

I thought about going the route of fresh flowers. I LOVE flowers, and I am totally going to splurge on fresh flowers for bouquets and bouts. But for centerpieces...I was just not sold. I mean, I have 12 tables to decorate. In order to make an impact, those would have to be some big centerpieces. And when big centerpieces meet fresh flowers, they make a flipping expensive wallet eating baby. Not cool. Besides the cost, what am I going to do with 12 huge floral arrangments after my wedding? Throw them away? Give them away? Seemed like a lot of money for something that can never be used again. So fresh flowers went out the window.

Since I am having a fall wedding with brown as my central color, I saw something super cute I was way into for awhile. Using coffee beans to fill a vase (maybe mixing in some colored beads for a pop) and putting some branches into them. Then stringing those branches with strands of crystals and hanging tea lights off of them. I still think this would be a gorgeous and fairly cheap centerpiece idea. Hello? Buy cheap coffee in bulk at Sam's Club and collect branches from local garden stores. I think I would spray paint the branches if I decided to do this so they looked uniform. Anyway, I just was not feeling this idea for my wedding. It's super pretty and cost effective, but I just feel like it did not match.

Then, when I was browsing photos of candy buffets, it struck me. If you've been keeping up with my blog, you will probably recall in the photo of the candy buffet that I love there are some floral arrangements in the back. It is basically a submerged flower, in water with a floating candle. I am in love with the simplicity and elegance of this idea. The challenge was making it happen. I originally thought Calla Lillies. They have a nice shape that would look simplistic and gorgeous submerged in water. And I would need exactly 12 of them. Hey! I could do fresh flowers that way! But after continuing with my "wedding research" I fell in love with flowers like peonies and anemones. Calla lillies are so not the same "type" of flower and so that idea went by the wayside.

Well, long story short...mom and I went out and about today to run errands and decided to go to Hobby Lobby to look for a stamp for my invitations. As any woman knows, you cannot walk into a Hobby Lobby without exploring the whole store. Before we knew it we found some beautiful aqua blue and ivory tulle for my flower girl tutu for $1.90 a yard. That was already a score so we were about to walk out the door when something caught my eye in the faux floral department. Normally, faux flowers are a HUGE no no to me. Just Yuck. Who wants fake flowers that obviously look fake at their wedding? The thing was, these did not look fake. They were gorgeous. The perfect color of pomegranate red faux phaelenopsis orchids. They were $5.99 a stem, which is pretty pricey until I looked up and saw that all faux flowers were 50% off today.only. Um, meant to be?! We selected the best ones and decided to go look at vases just for fun. When we got there, we found the most gorgeous 24" graduated pillar vases that the orchids fit inside perfectly. I almost screamed when I saw they were $27 apiece! ($27 x 12 tables = $324 for VASES alone!!) Then my mom pointed out to me the glorious bright red sign I had somehow missed. Those were 50% off too. SCORE!

I swear you have never seen a person go scramble for a cart so fast. We loaded those suckers up and got most the makings for my centerpieces for...are you ready...$180!!!!!! Yes. Victory. Sweet Victory.

When we got home I could not wait to try it out, so I put an orchid in a vase and filled it up with water. I almost freaked out for a second because the water turned a lovely shade of pink after I filled it up. Then I realized I had not removed the tag, which was bleeding red dye into the water. *phew* I arranged some tea lights I scrounged up around it to create a similar effect as what we will have at the reception ballroom. The result was stunning. I stood in the kitchen oogling that baby for a good 10 minutes. Wow. Just wow. For something so cheap and simple, it is simply gorgeous.As pretty as the orchids were outside of water, being inside the glass covered in water made them magnify by like 4 times. And they look real in the water. And they will not wilt! I left my centerpiece mock up assembled for six hours (roughly the time of the reception) and it still looked as gorgeous by the time I took it apart.

The only adjusting I am doing is adding some black river rocks to the bottom of the vase to anchor the orchid. Then, the whole thing will be placed on a mirror in the center of a round table (covered in bronzey-brown sheer table cloth) with tea lights scattered around. After seeing it, I decided the floating candle was completely unnessecary. The best part? I can assemble these ahead of time and the only thing I will need to do on the day of the wedding is fill them with water. SO HAPPY. I am in love!!!

Here's a sneak peak of my precious :)

Keep in mind, much more care will be taken in assembling them for the actual wedding. IE: no bubbles in the water, straight flowers, etc. but still, even for a rough draft...just gorgeous. And cheap without looking cheap at all. YAY! I can finally say it! Centerpieces: CHECK!

Thursday, April 1, 2010

A True DIY Bride

I apologize about the lack of (interesting) posts lately. The past 2 weeks or so have felt like an absolute blur. I keep thinking of new "must haves" for the wedding and worse than that, how I can do them myself. I *may* be in over my head a little with all my scheming and dreaming. The second bedroom at my mom's house has completely transformed into a DIY Disneyland.

I absolutely love doing things myself, I think I will enjoy my wedding so much more being able to see all my loved ones noticing and enjoying all the little details throughout the day. There are two things that get me through this process: Pandora Internet Radio (which lately has been on a Jason Derulo station...so not my usual type of music, but it's upbeat and he has an amazing voice) and my Charlie (who is now 4 months old and growing like a weed...my baby doggie is no more). He loyally sleeps under the DIY table on his blanky while I partake in the mind numbing task of making pocketfolds. I will eventually post photos and instructions to my invites, once I feel like I am making real progress and design the inserts and belly-band etc.

Today it is 6 months until the big day, and I really have to kick it into high gear. THIS month I need to find and book: a wedding cake baker, a DJ, a florist and an officiant. Most of those should be easy. But Josh and I are not church-goers. We believe in...and love God...but have yet to find a place we can call our own. That's the part that makes me nervous, finding someone to marry us. EEK!

Just for grins (or to give myself a lot more gray hair than I already have) here are allllllllllllllllllllll the DIY projects I have done or plan to complete:

*Save the Date Magnets
* Pocketfold invitations
* Invitation Inserts (which includes stamping and embossing)
* Ribbon Belly Bands
* Envelope liners for the invitations...something like this:
 (I may do the piece of scrapbook paper that was my inspiration for my wedding colors, or take it to the next level and use one of our engagement photos)

* Monogrammed Aisle Runner
* Guest Book  (completed today on Snapfish.com for $10!!!)
* Tissue Paper Pomanders to hang at the reception...like this, but in our colors (tiffany blue and pomegranate)
 (I want little pops of color around, and these are super cheap and easy!)

* Framed photos of loved ones for our memorial table
* Slideshow of Josh and I growing up
* Presents for my girls (keeping those on the DL for now)
* Custom ETCHING of the groomsman gifts (yes I really am crazy)
* Embossing Cocktail Napkins
* Designing and purchasing all the stuff for the candy buffet!

(Hopefully to look something like this:)
 
 SO.AMAZING.
* Programs
* Centerpieces
* Flower girl tutu :)
 
 (I am currently obsessed with this adorable idea)

* Making tulle/twinkle lights into some sort of arrangement for over the dance floor
* Escort/Place cards
* Monogrammed Favor Bags
* Table Numbers
* Thank You Parasol for a photo op
* Cake Table decorations
* Getting super amazing abs (YES this is a DIY project, lol...so far I've lost 4 pounds and SEVEN inches from various body parts within 2 weeks....I <3 it!)

Ummmm...that's really all I can think of right now, but heaven help me I have a feeling there's more. Phew. Deep breath...6 months. I've got time! I will post updates as soon as I get some stuff done. I better go to bed now so that I can actually sleep in anticipation of seeing THE dress tomorrow :)

Saturday, March 13, 2010

DIY Aisle Runner

I guess it's official! I'm a real DIY bride! I completed my second project yesterday with the help of my amazing sister. She is a perfectionist like me, so it was really nice to have her there...not only as someone to talk to, but as another set of eyes that could tell me her honest thoughts throughout the process. My sister is my Maid of Honor, and I could not have picked a better person for the job. She is honest when I need it, encouraging when I screw something up and there to laugh when I fall off the chair in the midst of trying to take the picture of the finished product! Don't know what I'd do without her...

This project was super fun and really easy. I think it is something really special that is just going to add a littler personal pop to our teeny, cute chapel. It photographs really well too and my little brain is already ticking off shots that we could do to incorporate it. Anyway, here you have it....my aisle runner!

The first thing we did to start this project was went to Joann Fabrics and bought the aisle runner. It is made by Wilton (basically everything wedding related in a craft store is Wilton). Originally, it cost $29.99, but I had a 40% off coupon so I only paid $19. Then I picked up two bottles of paint: one in Tiffany blue, the other in a bronze and a pack of paint brushes. All that cost me about $6 because I chose stuff that was 50% off at Hobby Lobby. My mom designed our monogram in Microsoft Publisher and we got it printed at Kinko's for $3. So altogether, this little project cost $28.00! Not bad!!!

Once I had all my materials assembled, I knew I needed to cut my aisle runner down quite a bit. It comes on a roll with a string that you pull to roll it out, and it is 100 feet long. My aisle is a measly 35 feet long! I cut about 40 feet off, leaving some extra on purpose in case I messed anything up. I folded up the material that I cut off, and I am thinking I will be able to use it later for something else (maybe a table runner or something).

First, I cut my monogram paper so that it would fit on my table. Then, I taped it down nice and tight. Next I laid my aisle runner over the top of the paper monogram, keeping in mind that I wanted the monogram about 5 feet from the end of the aisle. I taped the aisle runner to the table as well, making really sure it was straight and tight, so there were no weird creases or anything.


Then we set to work tracing over the monogram with a soft lead mechanical pencil. We were using dark colors so we weren't afraid of tracing too dark.

Here's Meg tracing away. 

Once the monogram was traced, we undid all the tape, took the paper monogram off the table and threw it away, we were done with it at this point. I then covered the entire table in wax paper, taped it down and retaped the aisle runner over the top of the wax paper. Once we had the wax paper in place, we were ready to start painting.

The monogram all traced and on top of wax paper.

We decided to paint the "P" first since it was the lighter color and would probably need more coats. We were right. It took almost 3 coats to make it bright and filled in completely. We found what really helped was having a cup of water ready so that every few minutes, we could rinse our brush and then dab it on a paper towel. Otherwise our paint was getting too gloppy on the paint brush.


If I could give any advice, it is to be PATIENT and take your time. It took us about 20 minutes to get our "technique" perfected. It seemed to work best to use the edge of the brush to make a smooth line on the border of the "P" and then fill it in. We did about 2 inches at a time. After the P was all filled in, we let it sit for about a half hour to dry. Surprisingly, the paint dried really fast. Because of the fabric, we definitely needed a couple coats to get it nice and even.

After the blue paint was dry, I set to work on the smaller words. Meg was afraid to do those because we didn't really have a teeny paintbrush, so I used my medium sized one and just went super slow and super carefully. 

  
Here I am painting our names. 

It was a good idea to start in an upper corner and work diagonally down, that way I did not smear anything. I only did one coat on my smaller words and I left it so that I could sort of see the pencil outline. It added a nice drop shadow effect to the words. $28 bucks and about 2 hours later, our masterpiece was finished!!!


I am so happy with how it turned out. I LOVE the colors. I left it out overnight and this morning I am going to cover the painted part with wax paper and roll it up. Then I will put it in a garbage bag to keep it nice and clean and I will have something to set aside that is COMPLETED for the wedding!!!

Sunday, February 28, 2010

DIY Save the Dates

The time has finally come to reveal all my secrets about our Save the Dates! I have been looking forward to writing this particular blog because this project was my first big DIY project and I was absolutely thrilled with how they turned out!

With the help from my mom, we got all the materials to complete this project gathered pretty quickly, and I just sat down one day and assembled them. They came together really fast once the magnets were printed and cut and once we figured out how to format my cards on Publisher. I feel like what we came up with is incredibly true to the theme of our wedding and of my own personal style. This, my friends...is how it's done!


Let me just start by saying tha during the last few months, whenever I would see something I could use and it was cheap or on sale, I would buy it. This meant I have kind of a wedding hoard going on right now...lots of materials just waiting to be busted open and used. Anything I don't end up using can be returned, or handed on to another bride after this process is over. Anyway, here is a break down of the materials I bought:

Materials:
*Ivory invitation envelopes 4 3/8 in. x 5 ¾ in. Box of 100, bought at Office Depot for $10.50
*Aqua Blue cardstock, pack of 250, bought at Office Depot for $12.00
* “Bride’s” Floral Table Confetti in a bucket, bought at Michael’s for $4.99
*Elmer’s Glue-All Dual Tip Pen, bought at Michael’s for $1.99
*Pioneer Clear Photo Corners, box of 250, bought at Michael’s for $2.99
*Photo Magnets, printed and assembled at my local portrait studio for $50.00
*Postage, $22. (I used Forever Stamps.)

Instructions:
*The very first thing we did was formatted our backing card on Microsoft Publisher. We went through several different layouts, fonts and looks and ruined more than one piece of paper trying to print them correctly. In the end we went with a really cute poem my mom wrote for us:
* I cut my cardstock using my Cricut paper trimmer to 4.25 x 5.5 inches so that my cards would fit nicely in my envelopes.
* I designed my magnet design in Adobe Photoshop using one of our engagement photos. Once this was done, I saved it to my SD card and took it to the photo studio to print and assemble 50 magnets.
* I took my completed magnets and put the photo corners on them before sticking the whole thing to the cardstock. I just eyeballed the placement and then pressed down on each photo corner to ensure that it was stuck on.
* Using my Elmer’s glue pen, I carefully and painstakingly painted glue on each petal of my floral confetti, and then I placed the flowers around the words on the card. I did glue my fingers together multiple times, but despite being a pain in the butt, this part only took me like an hour.
* Lastly, I addressed my envelopes with brown and blue felt tip pens that I already owned, stuck a stamp on and put them in the mail.

(Here is a close-up of the cute poem and embellishments.)

This was the easiest project ever, and they turned out so cute. Just for those who might want to know, I am going to include the actual cost breakdown of my Save the Dates, taking into account the amount of materials I actually used.

Actual Cost:
* Envelopes - I used 50 of them: $5.49
* Cardstock – I only used about 50 sheets, counting mistakes: $2.00
(I plan on using the remainder of this cardstock for other projects i.e.: place cards and I will calculate that cost when I use some more)
* Floral Confetti – I did not come close to using the whole bucket, but for the sake of being easy, I’ll calculate the whole thing: $4.99
*Glue Pen - $1.99
*Photo Corners - $2.99
*Magnets - $50.00
*Postage - $22.00

Grand Total: $89.46…I’m going to round up to $90.00
$90.00 divided by 50 Save the Dates = $1.80 each.

Considering that these are custom, that price cannot be beat. I am extremely happy because just doing some research online, Save the Dates ordered from catalogs etc, run approximately $3.00 each. I definitely am happy with the bargains we found and the fact that my Save the Dates are 100% unique. Remember Brides: just because something is labeled in a certain way does not mean you cannot use it for other things! I used table confetti to embellish my Save the Dates for MUCH cheaper than I could have found, say, scrapbooking embellishments. Be creative!

Monday, February 15, 2010

Save the Dates

YAY! I just completed my first big DIY project for the wedding. Our save the dates! Since I have such an awesome connection at a portrait studio, I decided long ago that I wanted to do a save the date magnet with our photo on it. I did not want to just stick a magnet in the mail though, so I had to devise a plan for a sort of card to put it on and make it look cute. As I am sure you know, I draw a lot of ideas from my "muse," Heather at road to the aisle. She is a DIY genius and I truly want to be just like her. However, I want my wedding to still be mine, so I have taken some of her ideas and put my own spin on them. Our weddings are very different in style, and its awesome just to have a model to go off of when there are so many teeny details to think of.

I really am super thankful to my wonderful mama in all of this. She is the one with the patience to sit there on Microsoft Publisher and design the layout of the card. I absolutely LOATHE formatting documents, so thank the Lord I have her to do those ucky things for me :). I designed the actual magnet with one of our engagement photos in my beloved Photoshop. I actually have just recently become good at Photoshop, I could always use it to edit photos, but I am having so much fun learning how to create things on there...this was my first creation:


I wanted to incorporate our unusal wedding colors into this first project as well as all the others I have in mind. We are going with mostly chocolate brown with pops of tiffany blue and kind of a pomegranate pink. I got the inspiration for this color scheme from a piece of scrapbooking paper of all things. I am a paper freak...I could have a whole room full of paper just because. I know there are people that read this blog that will be getting one of these in the mail, so sorry to spoil the surprise. I was just so ecstatic about getting my FIRST project done! That really makes all of this seem so much more concrete and real! I will post some instructions on what I did for my save the dates just as soon as I am sure that my guests received them in the mail. (Wouldn't want to give away any more suprises!)
I am thrilled with how they turned out, and although they took a lot of patience and accuracy with teeny tiny parts and glue, (which made me want to burn them!) I am very proud of the happy little stack sitting on my table just waiting to be stuffed into envelopes. Let the addressing begin!