Saturday, May 29, 2010

Goin' to the Chapel

From the moment I was engaged, I knew I could not get married in a "modern church." I have no problem with modern churches for services and bonding with other amazing people. But something about walking down the aisle on industrial carpeting between rows of folding chairs just did not hold the magic for me.

When Josh and I started our wedding planning journey, the plan was to get married in the beautiful Colorado mountains. That is why we initially chose a fall wedding. Just take a peek at the way our mountains look in October:

Can you blame us for wanting to be surrounded in this on our wedding day?

We began almost a six month endeavor of driving all over the state of Colorado, looking for that perfect venue. So many of them were gorgeous. But once we saw the pricetag, the beautiful mountain wedding did not look so perfect anymore. Aside from that, this beautiful lovely state has a way of making your truly a snotty mess whenever I am anywhere near a pine tree. How depressing is that? That was strike two: not wanting to feel like an allergic yucky mess on our wedding day. Strike three came when we realized how little lodging there was around any of these venues. We wanted our reception to be fun and obviously, fun involves alcohol and late hours. Neither of which are condusive to a 2 hour long drive home down curvy, dark mountain roads for our guests. Slowly, we were realizing the dream of a mountain wedding was really out of reach for us and our needs. 

We moved along after a tiny little mourning period (ended by a sneezing attack which made me cranky enough to get over it.) Our next choice: a roaring 20s style downtown wedding. I mean, we do live in a beautiful and historic city. We are both natives to this town. And the nightlife here is surprisingly glam. You know me by now, I was thinking of the photos we could click with this as our background:

There was a song when I was in high school that said,
"From up here the city lights burn, like a thousand miles of fire"
I love the thought of that. Gives me goosebumps. 

The hinderance with a Downtown Denver wedding was similar to the mountain wedding: price. I could not believe that a hotel downtown could charge over $8,000 more than a hotel 10 miles down the road. I could not accept that. Yes, we want a dream wedding...but just the fact that we are marrying each other is going to make it the most perfect day imaginable. We did not (and do not) want to go into our married life upside down in debt because of one day of our lives. We moved on. 

I swear I spent what felt like eight billion hours online looking up small chapels in the Denver area. Something classic, with amazing architecture and not to many stringent rules (no music, strict pre cana classes since I am not Catholic, etc.) I drove to them alone. I drove to them with my mom. Josh and I drove to them. Each time, something was just not right. I had never dreamed that finding a church to get married in would be the hardest part. I honestly do not remember how I stumbled upon our wedding chapel, but I am so glad I did. 

I do not lie when I say it is tiny. It holds about 115 people. We are trying to squish in about that many. Our guest list fell from 175 to 110. We have made sacrifices. The funniest part is, although Josh had seen photos of it, I actually put down our deposit on the chapel before he had even been there. He was convinced by photos that it was perfect and the price was right. And there were a handful of easy to follow rules. I booked it. It is in the center of the University of Denver campus and it is a Colorado Historic Landmark. The style of it is amazing. Red brick, high vaulted ceiling, stained glass, wood pews. Perfect. The other day, Josh and I finally ventured to the chapel together. He was amazed how small it really was, but said it was gorgeous. And the campus surrounding it is so beautiful too....full of trees that will be vibrant fall colors in October, with the mountains as a backdrop. I couldnt think of anything more beautiful. 

Standing inside the chapel with my fiance, I was so giddy at the though of being back in about four months to do it for real. There was a certain energy surrounding us in there, we were both all smiles knowing that we were standing in the place where we would finally marry each other. Here are some photos of our day:

  
As our guests walk from the (free) parking lot, this is the first glimpse they get of the chapel.

  
It is surrounded by reflection pools and weeping willows. 

  
The stunning stained glass window at the rear of the chapel. 

  
Sitting on the bench outside. Taking in the day and our beautiful chapel! <3
Music and Confessions

Sigh. I am FINALLY catching up with my "to do" list for the wedding. And let me tell you something: it feels ah-mazing. People keep telling me I am ahead of schedule...uhm...not really, crazies! I have deduced that this can mean several things: most brides wait til the very last minute to take care of details, most people are slackers and rather than be impressed by my accomplishments, they are bitter because they cannot be as organized and on top of it as me. Ha ha. Just kidding.

After almost three months of stress about finding a DJ that did not cost us body parts or our souls, debating whether or not to do the super tacky "iPod playlist" wedding or just having no music at all and pretending to belong to a super religious group that does not allow dancing...my wonderful, adorable, forgetful fiance remembered that someone he sees and works with every.single.day is a DJ on the side. His name is Adrian. He is awesome. And already on the guestlist. Josh asked if he would be interested and his answer?
"I would love to!! This can be my wedding gift to you." That's right people. GIFT. As in, this fantastic person is offering to DJ our wedding free of charge. o.m.g. Free?!? Does that even happen??? After I rebounded from the shock of this extremely generous and selfless gift, I was so touched that someone in our lives likes us enough to even want to do something so nice to help make our day for us. I am astounded at the support we have received thus far, and it really makes me sit back and understand that these people are not only providing for a wedding. They are providing and supporting our relationship and committment to eachother. And that is something that is unmatchable.

 DJ...CHECK. I am a music junkie so it should be really fun scouring my thousands of songs trying to create a play/do not play list for the wedding. I already have a couple do nots, but I think I am going to get vetoed. ; )

  • The Chicken Dance: Okay, who really likes having this tune stuck in their head for the whole rest of the day? Not I. It pretty much equates to the "Feliz Navidad" of punishment for me. And honestly...I cannot do The Chicken Dance in a gorgeous Maggie Sottero ballgown. Call me boring if you will.
  • The Macarena: In the same sense that I don't want to do a goofy, choreographed chicken dance on my wedding day, standing around with everyone we know slapping ourselves in the belly, the butt and the head just does not appeal to me. But, Josh's fam is hispanic...so, yeah. Big.Fat.Veto. comin' my way. 
  • Cotton Eye Joe: Annoying much?
  • Thriller: I am so not an MJ hater. At all. But, all I visualize is the scene from "13 Going on 30" where the entire ballroom turns into little monsters. Uhm. Scary.

I realize I just nixed 4 of the most popular wedding day songs. And I realize that I am bing silly about it. Its just music. Of all the little details going down, people are so not going to remember dancing/not dancing to  Thriller. I guess the real point of this is, I loathe dancing. I am a white girl. WHITE. And I have absolutely no groove thing goin on. Whatever skills I may have are completely buried by the fact that anytime I get dragged on to the dance floor, I am convinced everyone is judging me: "oh wow. Did she really just do the q-tip??" Lol. Some people have nightmares of speaking in front of a crowd. I have them about dancing on my wedding day. Sad, no? Even at school dances, if I thought anyone was about to ask me to dance I would suddenly get super thirsty, or conveniently have a horrible headache. Yeah.

Josh is a dancer. He comes from a dancing family. I am having a minor heart attack right now thinking about dancing. *sigh* Of all the things to stress about...really....really. I need a drink.

Wednesday, May 19, 2010

Flowers - check!

This past Sunday, Josh, my mom and I were up bright and early to go to our consultation with Holly from The Scarlet Bloom. I must say, I was nervous. Flowers are one of the tiny details of a wedding that become a central focus point: they are in the photos for eternity. I was also nervous because we are on a budget. At this point, the wedding budget is the law. We have to stick to it. Based on estimates from The Knot and other sites, I had guessed my flowers were going to cost about $500 total and that is what I budgeted for. It was definitely scary to not know if I was anywhere close to accurrate on that.

As it turns out, I did not need to be nervous at all. Holly is amazing. Besides my amazing friend and photographer Marci, she might be my favorite wedding vendor. She works from home in North Denver, so she made the drive out to where we live and met us at a local Starbucks. She was so prepared. She had note sheets already filled up based on the emails we had exchanged back and forth. She had her laptop loaded with photos (all in my own personal file folder) of the exact flowers she will be able to get her hands on. She told me she actually personally makes the trip to the flower wholesaler and garden that my flowers will come from so that she can select each stem herself to ensure quality. I am amazed by her.

Our consultation lasted about an hour. Although I am a perfectionist, she thought of details even I never would have. Basically, she listened to the style of flowers I wanted and then made some recommendations for me to choose from. What we ended up with was: English Roses, Ranunculous, fiddle head ferns, snowberries, pink lysianthus, and ivory spray roses. Of those, my bouquet will only be made up of blush and ivory English Roses and pink ranunculous with a couple fiddlehead ferns. My bridesmaids will have less roses and more of the other stuff to make them look a little different. Here's an idea of how those huge, gorgeous English Roses look in bouquets:

 
My bouquet will look more like this, mostly roses.
 
The Bridesmaids bouquets, more like this...less roses, more details. However, this blush color is going to be what my bouquet will look like, while the more magenta color above is for the bridesmaids. Confused yet? 

We decided we wanted our bouttonniers to be simple and masculine so they will be made up of a single ranunculous blossom with a fiddlehead fern, something like this:
 Our fathers and grandfathers, as well as our ring bearer will each receive a boutonniere as well.

Our mamas will be wearing a wristlet, while our grandmas will receive a beautiful pin on corsage.

My favorite detail actually arose while talking about our flower girl. Our flower girl is Josh's baby sister, Scarlet. All of Josh's siblings are a huge blessing to both of us. Scarlet is special though because she was just born when I started dating Josh. While his other siblings accepted me with open arms, Scarlet only has ever known me. I was even her nanny for the first year or so of her life. She is such a sweet, smart little girl with these eyes that lure you in. I decided pretty early on in wedding planning that I wanted her to stand out. My mom and I plan on making her a tutu to walk down the aisle in. Our chapel, oddly enough, does not allow real flower petals to be thrown on the ground. Well, I will be darned if I have to have fake rose petals to walk on. Uhm, no. Holly recommended that we make Scarlet a tiny little pomander ball to hold as she walks down the aisle. I am IN LOVE with this idea. It is so obvious, but I never thought of it. Scarlet will love it too I am sure. Here is an idea of what that will look like:


At the end of the day, I had nothing to be worried about concerning flowers. Holly relieved all of my fears. I told her, after selecting the flowers that I like, that she has free reign on creating whatever she pleases for the flowers. I feel confident that she will create exactly something that I would love. She also assured me that she will be in constant contact, letting me know what works and what doesn't. And she will be personally delivering my flowers to me on the day of the wedding. We couldn't be more excited for this enourmous check off the list.

Sunday, May 16, 2010

DIY Pocketfolds

This post has been a long time coming. I originally bought all the materials to create my own DIY pocketfolds way back in like November. I had done a few here and there but as of last week, I only had 34 out of the 80 that I needed complete.

I have been awarded a huge blessing recently in my life. Apart from finally working again (which is a blessing in and of itself), I am working at a store that definitely has slow moments. That and working part time hours allowed me to crank out the rest of those invites in record time. So now I can present to you: my pride and joy, the thorn in my side, my beautiful pocketfolds.


For anyone looking to take on this task, I will forewarn you: it is a lot of work and it is tedious. But once you find your rythm, it goes pretty quickly and it is so awesome to watch them come together before your eyes. 

To start, this is what I used to create these babies:
  • Cardstock, pre-cut to 16 1/8" x 7"
            I ordered my cardstock pre-cut, so that all I had to do was fold, score and cut the flaps.
  • Paper cutter with a scoring blade (I bought mine at Joann Fabrics for $9.99 with a 40% off coupon)
  • Bone Folder (to help make nice, neat creases) 
  • Scissors to cut the flap/pockets
  • Pencil
  • Double sided tape

            I read lots of reviews on The Knot and decided to go with Super Tacky Tape in 1/8", which I ordered from Paper Source.    

    The Supplies:

Since I decided to be smart and make my life easier by having the cardstock precut (for no extra charge at the wonderful Anchor Paper) the process got started very quickly.
  • The first thing I did was made score lines where my folds would be (I always went left to right with each step so I never got confused which side was which). You will need three score lines per invitation:
  1. The first score should be at 3 inches from one end of the cardstock. This score is for the flap of your invite. 
  2. The next score is at 5 1/8 inches from the first score line. The section in between these first two score lines is where the main part of your invitation will be. 
  3. The final score is 5 inches from the second score line. This creates the fold that will eventually become your pocket.


    **Something I found that saved me SO much time, was rather than measuring and scoring one invitation at a time, the better thing to do was mark where the score lines needed to be on one invitation with a little hash mark on the edge with my pencil. Then, I just layered another sheet of cardstock on top of that and marked the same lines. I would do about 20 at a time like this and then score them. Its a little step, but it saved me a lot of time. **
After scoring them, I used a piece of scrap paper to make my templates for the pocket and the flap. I ended up going with a pointed flap and a pocket with a deep "V" shape.
  • I used my flap/pocket templates to trace the shape onto my invite:
  
(Here I am placing my pocket template to trace it. )
MAKE SURE YOU TRACE IT SO THAT WHEN IT IS FOLDED UP THE POCKET GOES THE RIGHT WAY!
Tracing away. 
  • Once the flap and pocket templates were traced onto the invites, I used my scissors to carefully cut along those lines. 
These are my invites, scored, cut and ready to be taped. 

  • Next, I applied my double sided tape to both sides of where my pocket would be. I learned the hard way that you do need to do it to both sides or the cardstock would not stay tightly bound. 
 
FYI: I found this to be the most tedious step: applying the tape. It was hard to estimate how big each piece needed to be so I used my same pocket template and marked where the tape should end so I didn't have to guess. This eventually saved me lots of time and trying to peel off extra tape without ruining the cardstock. (Impossible and frustrating)

  • Peel of the plastic backing of the tape
  

  • Fold over the left side of the pocket and line it up.Press along the left edge to seal that side. Then, take your bone folder and crease along the bottom of the pocket to make a good fold. When you get to the right side, press down to seal that side too. Use your bone folder and press down along the edges where the tape is to make sure there is a good, tight seal.
                        **I have seen people fold and crease the pocket before applying the tape. I found this to be extremely annoying to do, because then the pocket wanted to flip up while you tried to put the tape on. Also, doing it this way (one side at a time) ensured that my pockets were straight.
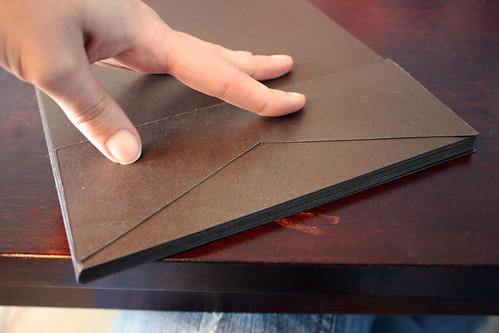
  • Use your bone folder to make the second crease where the next score line is:

  • Make the final crease for the pointed flap.
 
 TADA! 
  • Fold the whole thing over itself and there you have it. A complete (DIY) pocketfold!


    Lessons Learned:
    I found that at first, this whole process took me about 10 minutes per invitation. That is because I was doing it in the dumbest way possible. AKA: each invite from start to finish, one at a time. Once I figured out that I could make it sort of an assembly line, it went so much faster and was so much more fulfilling. By creating my own shortcuts (marking where my score lines should be, taping before folding, etc.) I estimated that each invite took me about 2 minutes. I was able to finish 50 of them in an hour and a half. So, that is my recommendation for anyone who would like to take on this task. Take a stack of like 20 at a time to break up the monotony of certain steps (ahem, TAPE, ahem). Then, the condensed version of all this chatter becomes: mark your score lines, score, trace flaps and pockets, cut flaps and pockets, tape, adhere, fold, crease, tada! It really does become a routine and you will get faster. At the end of this very large undertaking, I can say I am so proud of myself for creating our invites from scratch. And so HAPPY because they are gorgeous! I cannot wait to get all the inserts designed so they can be fully assembled.


Groom/ Groomsmen Attire

So after a year and a half of being engaged, and Josh being an EXCELLENT sport about everything thus far, I have finally reached a point where Josh actually is excited to put his true input into something. (Don't get me wrong, he has been amazing and excited about everything up until now also)...

The difference is, that along the way...Josh has told me on several occasions, "I am a guy honey, those two pinks look the same" or "I don't really have an opinion about flowers, I have never thought much about them honestly." And in reality, I feel like that is how most men are and I am grateful to him for pretending to care about the littlle details that he would never even have thought about. I love this man with all my heart.

So it is with great nervousness that I have finally signed over one wedding task completely to him. As the dictionary definition of a perfectionist/control freak this is a very big deal for me. But, just like I got to pick what I am wearing on the happiest day of my life, I felt like it was only right for him to get to choose what he wears. I put Josh in charge of the look of the tuxes. We agreed on the general idea: black tux, black shoes, brown tie but everything else is up to him: lapels, vest, pocket square, buttons, length, etc. I think he is really excited and so am I that he gets to have a big part in how our wedding party will look.

This whole experience, stressful as it may sometimes me, has been a dream for me because I have Josh by my side supporting me, letting me know that whatever we want we will make it happen: together. We are a team. We have been for five years. I cannot imagine spending one day without him, much less the rest of my life. I absolutely cannot wait to be his wife. The Knot says we have 138 days left. Its all coming together and so much more final now that we are finally getting to these details. :)

Sunday, May 9, 2010

Chaos!

Oh the ever growing pile of DIY projects just keeps growing! And somehow, every time I accomplish something another task seems to magically appear before my eyes. Currently, this is what my DIY room looks like:


Um. Yes. Complete and utter chaos. So many projects!

While on a (much needed) hiatus from pocketfolds, mom and I are on an everlasting mission to find the perfect stamp for the invitations. We found one we love on papersource.com which is an awesome site that has so many dreamy, crafty things on it. The stamp is called a cottage blossom but it basically looks just like the big flower on that red piece of scrapbook paper in the photo above. (The very piece of paper that has served as my wedding inspiration thus far)...The stamp itself is only $7.00, but then there is $10.00 shipping! Explain that one to me people...really....

I decided $17.00 for a stamp was a little assinine, especially considering I still had to buy ink, embossing powder and an embossing tool. So we made our way to Archivers. Archivers is a scrapbooker's paradise: full of stickers and paper and every kind of embellishment you can imagine. Before long, mom and I found a stamp that was pretty cute and talked ourselves into it. All the supplies cost about $37.00 and we got home and started playing and decided we still love the original stamp better. Go figure! So...being a retailer's nightmare, I really think I am gonna wash those stamps really well and try to return them. If I can't, I am selling those suckers on Craigslist. I am on a budget dang it...and I will stay on it!

In other wedding news, we have a HUGE check to mark off the list and I am so very excited to announce that one of our favorite people will be officiating the wedding for us! This amazing lady was actually introduced to us by my mom...because she works with her! Ms. Brandi was actually one of the main players in putting into motion the relationship my mom has now. Brandi pushed my mom to go for it and now my mom is engaged to him! Brandi and myself are kindred spirits...born under the same sign and you can tell. Since Josh and I do not belong to a church and have put it off this long, we decided that trying to find a church to call home now and getting to know the pastor there would be strained and awkward. And because it's only about 4 months away, it would really be like a stranger marrying us. Brandi has been around, hearing about Josh and I...our ups and downs...our big exciting news (my mom texted her right when we announced we got engaged and she even came to see the ring!) and everything in between and she knows us both. We love her and we are so excited to have her up there with us to seal the deal on our special day!

Friday, May 7, 2010

5 Month List

It struck me just now that I have not blogged about progress on my Knot list since the 7 month mark. The one thing from that list that I did not complete and have still yet to dive into is finding a DJ. I want our wedding music to be phenomenal...its just $1000 on music is very frustrating to me. I did edit that post so that it is all caught up now, but juuuuust to see how much I really have to do, here are the things the wedding Bible tells me I need to get completed this month!

5 MONTHS

1. Look around for local bands/DJs to provide the music for your wedding. Once you find one you like, put down a deposit to secure their services. 
(Like I mentioned above, this is the real one on the list I need to get a move on...I just cannot wrap my head around it)

2.  Choose your florist and put down a deposit. 
(This one is in the works. I have already decided on my florist, I just need to meet with her.)
05/16/10: Complete.

3. Make sure everyone in the wedding party is aware of what you expect of them -- especially your bridesmaids and groomsmen.  Provide a list of duties to the maid of honor and a to do list for the best man.

4. Book your cake baker. Write up a contract and finalize the wedding cake design you love. 

5. Finalize the reception menu with your catering manager.


6. Finalize your invitation wording. 
(This one cracks me up...I have to have completed invitations in order to have invitation wording people....)
05/16/10: Complete


7.  Reserve and finalize all wedding rentals (chair covers, sashes, etc)


8. Start planning your grooms/groomsmen attire. 


9. Book Honeymoon flights and make all other honeymoon arrangements. 
(Also hilarious...how can I plan a honeymoon when there's still so much to do with the wedding????)


10. Start addressing invitations. 
(Ha. Again with the needing completed inviations...guess that should be my number one, huh)


11. Decide on groomsmen formal wear. Take the men to get measured and to rent their formal wear.

I guess in reality, there is not that much that I need to accomplish this month as far as formal arrangements go. I finally got a huge check off the list in deciding an officiant. Now all I need are the sacred trifecta: music, flowers, cake. 

I also have an extensive list ot DIY things that I have gotten myself into, but for the sake of not trying to put myself in cardiac arrest, I will leave those for another day. :)