Then, only a couple days later...people began sending me text messages, posting things on my facebook or calling me about how beautiful they were. And again...that was the best feeling in the entire world. They were so much work. But they did turn out so beautifully. And people were telling me so. Awesome. This must be why DIY is so fulfilling.
Since then, its been a game every day. Check the mail, find a stack of pretty metallic brown envelopes. I even went super overachiever (read: nerd) and made a spreadsheet so I can keep track of who is coming, what they're eating, etc.
Anyway, here they are:
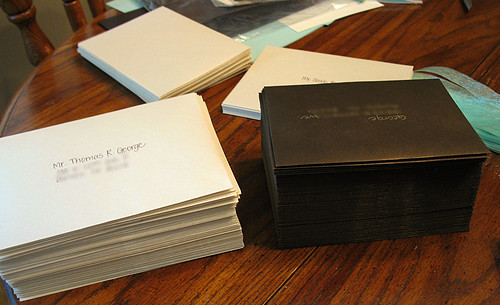
The night before assembly, we sat down and addressed all the envelopes.
I used Envelopemall.com to order my envelopes. The main invitation envelopes (on the left) are Stardream Metallic A7 Euro Flap Envelopes in "Opal." They are so, so unbelievably pretty. They are an ivory color with a slight sheen. I feel like they complimented the invitations really well. They were $18.95 for 100. I ordered 100 and cut it pretty close. The RSVP envelopes (right) are Stardream Metallics A6 Envelopes in Bronze, which is the same paper I used to make the pocketfolds. These envelopes were 4 3/4" by 6 1/2" and so my RSVP cards were a pretty tight squeeze, but it all ended up working out.
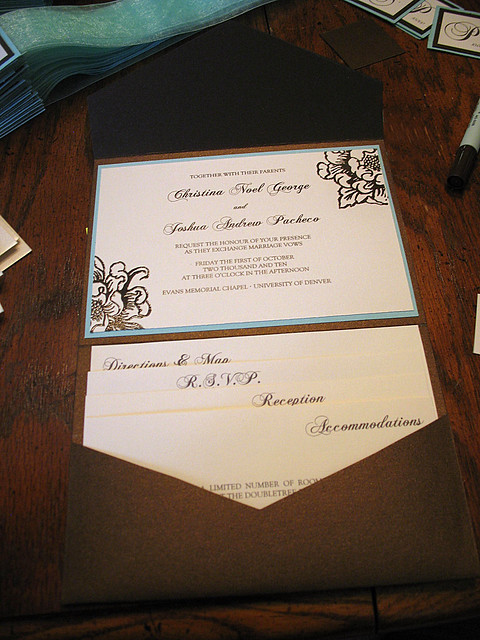
Once opened, this is what the completed pocketfold looks like.
Excuse the terrible photos. I could not find my battery for my big Canon, so these were taken with my old crappy point and shoot.
You can see how we formatted the inserts to be descending steps. This very thought contributed a LOT to the stress we had with making them look just "so." We used the same script for the insert headers (Chopin Script from DaFont.com) as we did for our names on the main portion. I feel like this added a little extra elegance and just tied everything together. All the rest of the font was the same as well (Goudy Old Style, done in Caps Lock...because I'm a rebel)
Here are the inserts, up close and personal:
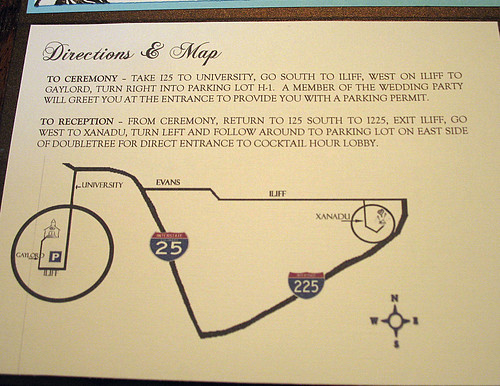
I actually "custom made" this map using newly learned photoshop skills. I did a screen capture of a google map, then opened it in Photoshop, traced the roads I needed, added the icons and the names. Sounds easy but it was honestly a HUGE P.I.T.A.
The RSVP Cards. My Favorite part. The bane of our flipping existence. I decided early on that I wanted them to be personalized. I thought it was fancy schmancy. And awesome. And I would not take no for an answer. Even when mom and I were literally drinking whole bottles of wine and laughing hysterically to try not to rip our hair out and kill things. Through all the struggle, they turned out so incredibly beautiful. *Sniffle* I am so proud. And THANKFUL for my mom, the formatting queen.
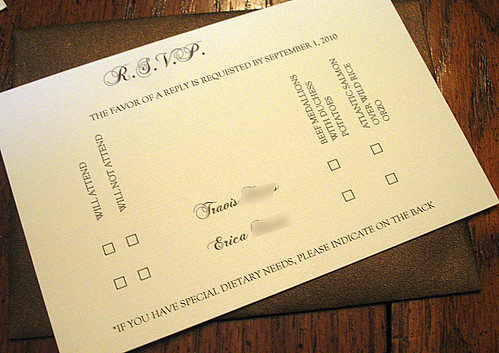
So stinkin' cool. The names of our guests were printed in the Chopin Script. Just cause. :)
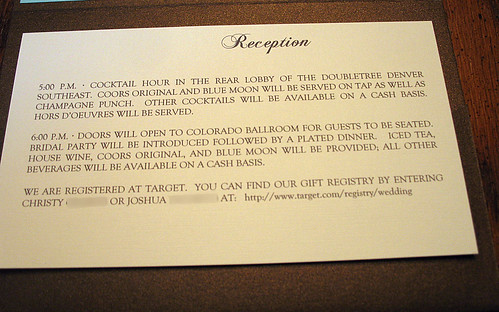
Reception Card. We had fun trying to figure out the wording for this one. We did not want to sound too snotty. Or too casual. I am pretty sure we read it aloud over 50 times.
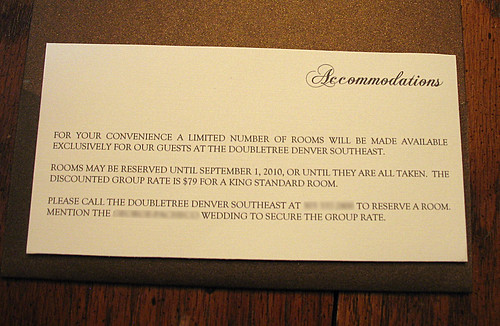
And lastly, the Accomodations card. We tried to squish all the words down so you couldn't see them above the pocket. Then we decided that was just silly.
Originally, I was just going to stick the RSVP envelope in the pocket behind all the inserts. Too bad I used coverweight paper for all the inserts and the fit inside the pocket was just too tight. A few pockets even popped. After a little meltdown and some histrionics, we finally decided to just hook the flap of the pocket of the RSVP envelope over the back of the Directions insert, so it would lay flat on top of the inserts. It kind of took away from the impact of the inserts at first, but then I figured, people would just slip it off and all would be right with the world.

Then all we had to do was slide on the belly bands. I LOVE the belly bands.
As I have said multiple times, these babies were a lot...a LOT of work. But in the end? Totally worth it. I feel like people close to me will treasure these as keepsakes. Because they are. I think they are much more special than a storebought invite because each one literally has my blood, sweat and (many) tears involved. I may or may not go into business making these now, because...well...I am a pro now.


No comments:
Post a Comment